Friday, August 31, 2012

Things To Click and a Promotion or Two

Hello there!

Happy Friday one and all.  It's a long weekend this time!  For some of us the weekend brings the last summer barbeque and a camping trip or two, live music or a relaxing day with friends.


This weekend - Three Days Only!  The Alchemists Vessel is having its first Labor Day Sale!  That's right!   Saturday through Monday, enter the Coupon Code: LDAY10 and received 10% off your total purchase price.  Some special in-shop items include free shipping, like this pendant.

Sterling Silver and Black Onyx Genuine Gemstone Necklace


That's right Monday is Labor Day!  Yes, it is a Federal Holiday.  Yes, it means that most of us have the day off from our jobs, whatever those may be.  For some it means sales and shopping, for others it is a day for the Honey Do list and household chores.

Labor Day: 11 Facts You Need To Know


After we have had a refreshing weekend, it's time to head back to work or school.  It is also the beginning of Market Season!  Flea Markets, Holiday Gift Shows, Specialty Booths, they are all a great place to find that unique and must have item.

Treasure Valley Flea Market, September 8th and 9th, 2012.
5610 Chinden Blvd. Garden City, ID
Idaho Expo at The Fair Grounds
Saturday - 9:00 a.m. to 6:00 p.m.
Sunday - 10:00 a.m. to 4:00 p.m.
Admission is $2.00

We hope to see you there.  Booth #28, The Alchemists Vessel.


New Classes in September at Jo-Ann Fabric and Craft Stores with your friendly instructor, me.  Jewelry Basics is always available,  and covers the basics from tools to findings and a completed project to take home.  Learn to make "Pretty in Pearl" earrings in two designs.  New project is an interesting Swaovski Crystal bracelet.   See your local store for details.  


Classes are taught at the Milwaukee location.
1085 Milwaukee
Boise, ID
(208) 323-5373
Call or Sign up for classes in store.  
*Open House Saturday Sept. 8th at this location.

Thank you for stopping by and having a look.  

The Alchemists Vessel would like to wish you a pleasant Labor Day Holiday.

Thursday, August 30, 2012

Quick Pictorial Tutorial Thursday

Good Morning!

The week is winding down and so am I.  Today I thought it would be fun to look at an easy and relaxing jewelry-making craft, Wire Wrapped Rings. Yes, I said, relaxing. This is actually a really fun and super simple project.  Even the kids can do it!  One of the best things about this project is that it takes just minutes to do.

Wire-Wrapped Rings in Sterling Silver plated Copper jewelry wire


I think every jewelry blogger, designer, maker, or hobbyist, eventually sits down to write about or make one of these simple and pretty little rings.  This includes myself. 

All you need:

Jewelry Wire - *20 or 18 gauge (any type) Colored (anodized) Aluminum works well, too. 
(*I do not recommend 16 gauge or 14 gauge)
Wire Cutters
Permanent Marker or Lip Balm (or any round object - a "mandrel")
Measuring Tape
Pliers - if you like.
*Extra Embellishments (not necessary, but fun to play with).
Button
Glass Seed Beads (Size 6)

NOTE:  Jewelry wire comes in lengths measured in yards, usually between 8 to 10 yards per coil, that's 24 to 30 feet of wire.  You can make lots, and lots of rings with a single coil.  The Sterling Silver Plated Copper jewelry wire I used for this project is packaged by Darice and available at local craft stores for about $3.99 for 8 yrds.

Simple Tools and Wire


First measure and cut two pieces of wire 8" long.


Gently fold them in half.

Don't let the ends cross.
Put them together and place the marker, balm, or other round object ( "mandrel" about the size of your finger), in the fold.  Bend the wires around the marker or balm with your fingers.

Don't let the ends cross, keep each wire next to each other.
Next, Adjust the wire where you want it.  *Remember it will be a little looser at this stage.  That is OK.  With your fingers, hold the bottom of the wire against the madrel, with your other hand, take the wires between your fingers and twist in a clockwise motion, locking the wires together (like a twist tie).  Keep the wire as tight as possible against the mandrel as you twist.  Twist only once.

Twist the wires once, clockwise.


You may take a pair of pliers or your fingers and bring (pinch) the loops together.

Now  continue to twist the wires, one group of two at a time around each other twice or three times.  Stop.  Can you see the "rosette" forming in the center of the ring?  Good.

The Rosette is formed and wires are divided.

Now, divide the wires.  Decide which wires will continue forming the rosette and which to pull away from the center.  Do not cut the wire.  Above the wires closest to the rosette have been left in place, the others have been stretched out and away from the center of the ring.

Continuing wrapping around the center wire forming a larger (or smaller) rosette as you choose.

The Rosette is complete, the wrapped wire is now much shorter.

Trim the excess wire from the Rosette.  You may wish to leave a little extra to bend over and tuck under the edges of your ring.  I did not do that in this example.  However this helps to keep the wire from snagging and possibly ruining the ring.

Next, and this can be a little tricky.  Remove the ring from the madndrel, choose one side of the ring and begin wrapping the other length of wire around the shank (round part) of the ring.  It helps to bend the wire slightly so it slips into the center of the ring.  Wrap the wire down the shank.  Make sure to wrap both sides.  This will help the ring keep its shape, make it a little smaller in diameter, and adds an interesting design element as well.

One side is of the shank wrap is complete here is the other side in progress.

Make sure that the wire ends are on top of your ring shank, cut off the excess wire, keeping the ends up and away from your skin so you do not scratch yourself.

The complete ring on the marker (mandrel).
You can wear the ring on any finger it will fit on or that you have sized it for.

Pretty little bauble

Completed ring.


You can also bead the last twist of the wire around the rosette if you like or you can use a button as a focal point.  As shown in the alternatives below.

Black Czech Glass Seed Beads adorn the side of the rosette.

Shell Button Ring

The button ring is made using the same technique.  Once the wire has been placed around the mandrel, side the wire through the thread holes in the button.  Bring the button down as close as you can to the mandrel, and then twist the wires together.  Instead of separating the wires and wrapping them down the shank, use all four to form the rosette in the center of the button, cut off the excess wire and wear for fun or with Kitschy fashions!


Reddish-Orange Shell Button with complete rosette

There are many other ways to add to or embellish the ring.  Why not try glass bi-cone beads or a gemstone or maybe even a crystal.  Perhaps a charm or other interesting object, like a gear or tiny vacuum tube could be wrapped as well.  The possibilities are endless.  What might you design?

T.A.V. would like to thank Carrie S. for the use of her camera.

Thank you for stopping in and having a look.  We hope you found this tutorial interesting and will try a wire-wrapped ring of your own.

The Alchemists Vessel would like to wish you a pleasant Thursday.


Wednesday, August 29, 2012

Studio Shuffle - What's Going On At The Workbench

Happy Middle of the Week to you all!

After last weeks fun with Cuttlebone Casting,  I took a little break and did something simple.  Sort of.

Occasionally I will buy Estate Jewelry in bulk, usually it's pretty much costume jewelry that is broken or will be taken apart for its bits and pieces.  Every once in a great while I come across something exceptional, a wonderful surprise of promising buried treasure.

I failed to take a photo of the piece before I took it apart.  But the thought of blogging about it didn't occur to me until the piece had been re-worked and finished.  Oops!  Also I have come to find out that the Photo Editor on my computer is having problems, so I have been reduced to attempting to take pictures with the cell-phone's camera.  Not and easy feat!

"Blue Tile" is the up-cycled outcome of the salvaged necklace.  Originally 18" long, with clusters of glass baubles and several damaged tiles.  It was attractive, but I saw potential for something unique and interesting.

I removed the damaged pieces and the clusters of glass beads, cleaned and polished each tile, restoring the mirror finish and high shine.  Using the original jump rings and clasp I re-linked each tile individually, re-creating the necklace.  It now looks like this.


Description: A fabulous piece for Egyptian, Southwestern or Turquoise admirers. Occasionally I purchase Estate Sale Jewelry in bulk, and every once in a while something exceptional appears. This absolutely gorgeous necklace is up-cycled from its original 18" length. Damaged tiles, links, pieces and clustered glass doo-dads were removed, the original parts salvaged and re-created as this fabulous and unique 15-1/2" necklace.

Would make a wonderful alternative for a December Birthday!

Other things going on in the Studio:

I made my second ring, and the first one I am willing to put in the shop for sale.  After a lot of practice and several failed attempts I have something that I think I really like!  I need to make more, I am obsessed with the process now.

Hot off the anvil


Description: Hand forged Sterling Silver and genuine Malachite ring. Size 6 - 6-1/2. Will fit pinky or ring finger.

Would make a wonderful alternative for May Birthdays!

Created with Sterling Silver sizing stock (stamped "Sterling"), sterling silver bezel and sterling silver jewelry solder (for attachments and accent swirls). Genuine Malachite cabochon is 6mm, setting is 7.5mm to 8mm. Sterling silver wire has been used to create the swirl accents on the sides, they are soldered to the sides of the shank. The shank has been soldered at the bottom to keep the double strands together.

All elements of this ring have been crafted by hand, the cabochon stone was purchased through a gemstone supplier and is A grade Malachite.


Detail Photos


Next weekend is also the first Market of the season, we are getting prepared and packed to attend! 


Thank you for stopping by and having a look.

The Alchemists Vessel would like to wish you a pleasant work week.

Tuesday, August 28, 2012

Six Great Gifts For Giving 8/28/12

Tuesday is here and so are six neat items for giving.  An eclectic collection of items for the home and a vintage piece of jewelry or two!


Description: This is a hand painted tote bag with Autumn colored flowers. The seasonal red, orange and yellow flowers make this bag a cool Fall accessory. There are bright green and white leaves to compliment the flowers. A pretty silver butterfly charm adds its own sparkle. This is a fun bag that you'll find yourself going back to again and again.
13.5 in x 13.5 in x 3.5 in


Description:  This is a OOAK hand painted tile trivet with purple and white flowers. It has bright green and white vines swirling around the flowers. This gives it a nice sense of depth and movement. It can be used to hold something hot or just for a decorative accent. It's a great way to add a splash of color to your kitchen.


Description: The graceful movement of a ballerina is perfectly captured in this lovely pin, circa 1950.

It is 2" long by 1 3/4" wide .
Non magnetic golden material.
Clasp is a little tight, but works properly.
There is some slight wear to the finish at the tip of the toes and very top of the head. Noticable only very close up in proper light.

Overall very good vintage/used condition.


Description: 1960's KENNETH JAY LANE KJL STAR BROOCH PENDANT LARGE

Kenneth Jay Lane Signed (K.J.L.) Brooch / Pin Pendant from the 1960's

This rare Kenneth Jay Lane Brooch/Pendant is a stunning statement piece. It is in excellent condition, and is signed K.J.L. This is an early Lane mark, from the 1960's.
The center of the star is nicely cut pave rhinestones, and is lifted a bit from the frame, giving dimension. The additional smaller points of the star are just at bottom of the frame level and also pave rhinestones. The piece is framed in a gold tone. Pin closure operates properly, and there is a hook to enable use as a pendant as well.

A truly beautiful piece which will undoubtedly continue to increase in value.


Description:  This professionally printed 8 x 10 canvas giclee print of two giraffes is a reproduction of my original paper sculpture collage titled "Under the Sun". Giclee prints are produced from a large format, high-resolution ink-jet printer and printed with archival inks.


This jungle animal print would look great in a baby's nursery or a child's room.
It would also make a unique baby shower gift.


Description:  This professionally printed 8 x 10 canvas giclee print of two zebras is a reproduction of my original paper sculpture collage. The original was created by handpainting watercolor paper using acrylic paint and then cutting, bending and layering the paper to create depth.

Giclee prints are produced from a large format, high-resolution ink-jet printer and printed with archival inks.

A mama zebra gently nuzzles her baby under a brilliant orange sun in "Eskimo Kiss".

This print would look great with "Dandy Lions" or "Giraffes" hanging in a jungle themed nursery or playroom.


Thank you for stopping in and having a look.

The Alchemists Vessel would like to wish you a pleasant day.


Monday, August 27, 2012

New Shop Stuff

Hello,

Welcome to the beginning of the week.  The Dog Days of Summer are winding down and the air carries a little chill this morning,  and the colors of the season are soon to change as well.

The Flea Market is coming up September 8th, and 9th, that's next weekend and we have been busy preparing and polishing all the goodies for the show!

Which means Labor Day is right around the corner, like next Monday, and Halloween is close behind, get those custom orders in to be sure you get your treats in time!


Description:  Natural Jet and Carved Carnelian beads grace this 18" long One-Of-A-Kind Halloween themed necklace. Center Piece is 1" wide with three Sterling Silver Charms , Pumpkin and two Bats. Sold as a set the Earrings are adorned with Jet beads on Sterling Silver headpins and Ear wires. Finished with a Sterling Silver Gothics Hook Clasp at the side (Very Fashionable)

Detail Photo

Here you can see the Sterling Silver Pumpkin and Bat charms detail.  The hand carved carnelian has a zigzag pattern that catches the light nicely.


We have also re-listed one of our most popular designs for earrings, Sterling Silver Hoops with Gemstones.  Available in a variety of stones.  These are limited to what is currently in stock and then they are gone forever!


Description: These are Blue Lace Agate gemstone beads in an oval shape.  Currently available in the listing are also Garnet, Malachite, Carnelian, and Turquoise.

Listing Description: Sterling Silver Six Drop Hoop Earrings with Natural Grade A Semi-precious Gemstones - available in a variety of gem and birthstones. Dressy to casual, great for gifts, makes a pretty tailored pair for that office attire, fabulous for Boho, Hipster and Rocker style too!

These are hand assembled with hand cut head pins, sterling silver beads, and full soldered Round six Drop Hoop Findings with Sterling Silver Ear wires. Beads are genuine garnet, Flat Oval Coin shaped beads. Also available in round-shape beads, and select stones are available in long-oval-shapes.

Sensitive to Metals? Hypo-Allergenic / Stainless Steel Ear Wires can be substituted at no additional cost. Please specify this preference when ordering.

Customization: These earrings can be made to order with a specific stone, and The Alchemists Vessel will set up a special item just for you. Please convo via this listing with your questions or preference, or for a complete list of stones currently available and in stock.

Arrives boxed, ready for gift giving.

Samples Shown: Garnet, Carnelian, Turquoise (4mm Round Beads), Blue Lace Agate,and Malachite. All gemstones are genuine and left in their natural state, only cutting and polishing has been done. The Turquoise is "Stabilized" or "Resin Polished", a clear resin material has been used in the polishing process to stabilize and lend the bead additional strength and enhance the color and surface shine of the bead. Turquoise is a soft stone and easily cracked or broken. 

Samples Shown Below


Sterling Silver and Genuine Garnet Hoop Earrings
zoom
Sterling Silver and Genuine Garnet Hoop Earrings Sterling Silver and Genuine Garnet Hoop Earrings Sterling Silver and Genuine Garnet Hoop Earrings Sterling Silver and Genuine Garnet Hoop Earrings Sterling Silver and Genuine Garnet Hoop Earrings


From Top, left to right: Garnet, Carnelian, Turquoise, Blue Lace Agate, and Malachite.


Thank you for stopping in and having a look.

The Alchemists Vessel would like to wish you a pleasant work week!

Friday, August 24, 2012

Cuttlebone Casting Part III - Casting The Piece

Hello,

Please note, due to technical difficulties some of the photos for this tutorial are not shown (photo error), this post will be updated once the photo upload decides to cooperate.  We apologize for any inconvenience this may cause and are working to rectify the situation.

This is the final stage in casting a piece of jewelry with a cuttlebone mold.  If you have not been following along or have just discovered this series, please refer to the previous posts for an overview.

Cuttlebone Casting - Part II Model and Mold Preparation


PART III Casting the project.

TOOLS:
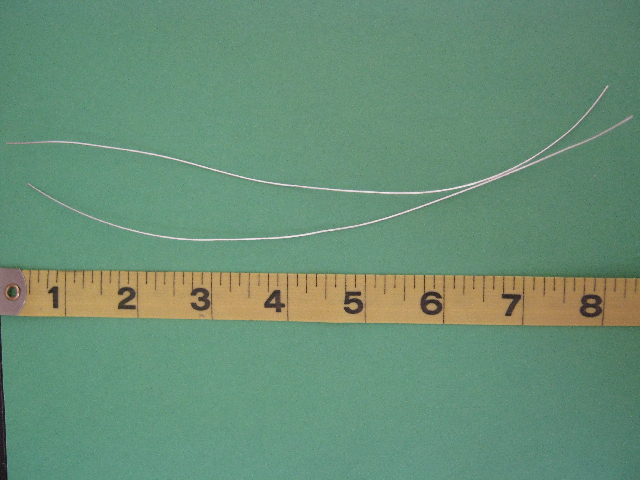
Tin Alloy Soldering Wire (4 tubes, 20 feet)
Stainless Steel Spoon
Mini-Torch
Prepared Cuttlebone Mold
Vice Grip or Prop
Safety Gear
Goggles / Glasses
Gloves, leather shoe strings (something to wrap the spoon handle) 

NOTE:  The sample casting shown used 2 to 2-1/2 tubes of Tin Alloy Solder, your project may require more or less depending on size of the model and depth of the impression.

SAFETY FIRST!  This lesson consists of playing with fire, and I mean literally.  Temperatures reach 400 degrees and possibly higher!  Be aware of your surroundings and your work area!  Remove any and all distractions and make sure you have an uninterrupted block of time in which to work.  Although this portion of the process is fairly quick, you must pay attention to what you are doing!  Turn off your cell-phone, send the kids outside to play, give the hubby a “Honey-Do” list and feed the dog; you must be and remain focused!

Last time we made a wax model and a mold from simple and easy to obtain materials.  Today we are going to complete the process and show the steps for actually casting the piece.  The step-by-step process for creating a mold may be read in CuttleboneCasting Part II – Model and Mold Preparation.

The cuttlebone mold is now ready for molten metal.  Cuttlebones are naturally heat resistant.  This means that they can withstand high heat without distorting in shape, and make wonderful molds for just that reason.  They are also a completely natural tool with no added chemicals and won’t harm the environment.  Eco-friendly jewelry creation, that’s a plus!

PRE-CASTING PREPARATIONS:

Prepare your work area.  Make sure it is free of anything flammable and fluttery that might catch fire or drift into the molten metal.  Place your mold in the Vice Grip or other object you have chosen to keep it steady and upright.  Get your spoon (or whatever you’re going to use to melt the metal in), torch, and tin alloy lined up, ready to go, and easily accessed! 

**TIP:  Trim the tin alloy coils into smaller pieces; this will make melting and adding it to the already melted material much easier.


NOTE:  Unlike other casting processes that use high-speed centrifuges or kiln (oven) burn out cycles (Lost Wax Casting) to distribute the material to the mold, all that is working here is gravity!  Pouring the molten metal into the mold is like filling a glass with sand, the material will be layered as you pour it into the mold.


Here I have the cuttlebone mold in a prop to keep it upright and steady as material is poured.  Closed with Rubber bands and waiting for metal to be melted and poured.

MELT THE METAL / FILL THE MOLD:

*The Spoon will reach temperatures of up to 400 degrees (the melting point of the tin alloy is 374-degrees), USE PROTECTIVE MEASURES!  Leather gloves or wrap the end with leather shoestrings to keep the heat away form your hands and fingers.

Begin by adding a small amount of the Tin Alloy to the spoon.  Cut bits off the coil first to make this easier.  Let it sit in the bowl of the spoon.  Do not try to melt the whole coil all at once.   Using a mini-torch, hold the spoon just above the flame and melt the metal in the spoon, continue to add bits of metal until the spoon is full.


The flame has not been turned on for these pictures, that would be hazardous to my heath and the I'd burn the house down.  These are to show the spoon's position it should be held up and away from the nozzle of your torch and the flame allowed to heat the bowl of the spoon from underneath.

Because the soldering material is a tin / rosin core alloy, you will see the rosin left behind in the spoon.  That is the brown discoloration you see.  Rosin comes from trees and is a brittle solid form of resin, it is used as a flux in some soldering materials to help the metal melt and flow at an even rate.  This discoloration will not appear on your piece, this is left behind after the melting process.


NOTE:  The molten metal will pool in the bowl of the spoon.  Adding pieces of material closer to the pool will help it to melt and incorporate into the ever growing puddle of metal.  It will slide around in the spoon hold the spoon steady while melting is in process. 

(Photo error)

Continue to add pieces of the Tin Alloy until the spoon is full.

Carefully pour the contents of the spoon into the Sprue Hole and down the Sprue Channel.


Repeat the melting and pouring process until your mold is full, you will have to look through the Sprue Hole and do a little guessing here to be sure that the material has filled the mold (impression) completely.  You DO NOT want to fill the Vent Gates or Sprue Channel, just enough metal to fill the mold of the Cross.

Instant Gratification…. Well almost.  After the mold is full, wait a full ten to fifteen minutes for the metal to solidify and harden.  The mold will also be cooling down during this time, making it a little easier to handle.


Here you can see the burn mark on the top of mold, where the spoon touched the surface of the cuttlebone.  Here the cuttlebone sits in its prop cooling down while the metal is solidifying.

Once time is up, carefully remove the binding from the outside of the mold, unwind the wire, slip off the rubber bands (whatever was used) gently, keeping the mold closed as you do this.  If you used Duct Tape (and I told you not to) you will have to cut it away with a razor-blade where the two halves of the mold meet and split the mold open like a book.

(Photo error)

Well looky there!  You have a metal pendant!  TAH-DAH!

(Photo error)

The tin alloy is soft enough that you can drill a hole in the top of the cross using a drill bit and your hand for a bail to be glued (soldered) into place.

FINAL FINISHING:

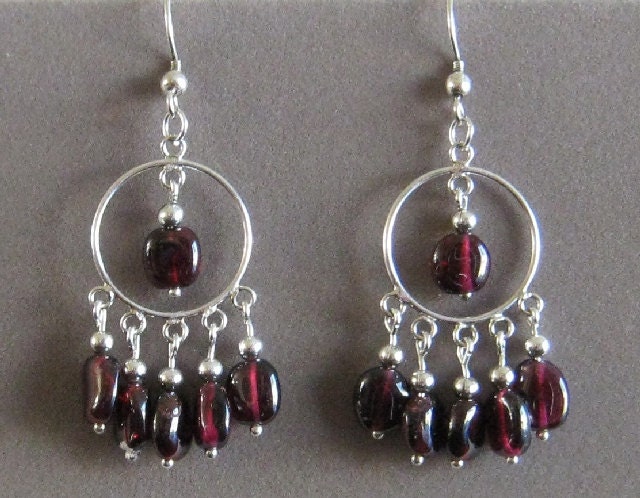
To complete my pendant, I will seat the simulated Garnet into the center hole of the Cross.  Using a brass rod that I have ground to a 45-deegree angle at one end, I will finish the pilot hole for the gem and seat it in to place.  Using a craft knife or razor blade, I will then create PRONGS by scraping some of the metal from the Cross up and over the gemstone in four evenly spaced places around the stone's setting.

Although this will leave dents in the exterior of the Cross surface, it will help secure the stone into place.

After the gemstone setting is complete I will use a Polishing Cloth (these have chemicals embedded in the material) and gently rub the surface of the piece, polishing it and giving a little shine.

It is now ready to be displayed or worn on chain or lanyard.

Thank you so much for stopping by and having a look, and if you have followed the whole series, thank you for sticking with us.  We hope you have enjoyed this brief look in to one of the many casting processes available and used for jewelry-making.

The Alchemists Vessel would  like to wish you a pleasant day.

**Want something like this, but don't want to do it yourself?  Custom work is available.  All custom molding projects begin at $50.00 this includes Design materials and Mock Up of your custom piece before casting in the material of your choice!  Precious Metals are available for this process. 

Please feel free to return for the updated post, once I get the photos to cooperate! 


Thursday, August 23, 2012

Thursday Feature - Etsy Tips

Greetings,

This morning I find myself sans an artist to feature.  So instead of featuring a single artist, I thought it might be interesting to give some tips, tricks and things I have learned about Etsy, and how to use the site.

What is Etsy?

Many people have never heard of Etsy.  To quote a friend, "Etsy is the World's garage sale".  Actually it is kind of like the World's garage sale, there are thousands of shops to peruse and all of it is handmade, unless you are searching for supplies for your handmade goodies.  Buyer accounts are free to sign up for.

Shop Presence, what is it, how do you do it?

Shop Presence is a buzz word for really nothing at all.  The idea behind it is that your shop stands out or is more present (accessible) than another.  What does this entail?  Building your store front, banner, shop items, and even your avatar count to draw people into your shop. Yes, the shop name may be important as well.

Shop Name:  "The Alchemists Vessel" doesn't give you any idea about what I do, however the name does give some idea of what you might find at my shop.  Gemstones, crystals, pendulums, unique items of unknown origin.   Think about the name and what it says about your shop.  "Kay's Jeweler's" leaves nothing to guess at, you know that Kay sells Jewelry.

As a seller / vendor you have about seven (7) seconds to grab and hold a shoppers attention before they click through to another shop or site.  How can you grab and hold on to that customer's / shopper's attention?  With your store front, of course. 

Make it interesting, colorful and informative.  The first thing a customer should notice is what you're offering!  Jewelry, Paintings, Knitted items, whatever, make sure that the customer knows they are in the right place to find what they are looking for.

The Banner:  The banner is just that, a big Title Block image at the top of the page.  This is mine.


It reads:  "Decorating extraordinary people with extraordinary jewelry". (A bit hard to read at this size, I know).

This banner tells you what I do, I offer "extraordinary jewelry", and of course the person shopping certainly feels that they are extraordinary anyway.

Your Shop banner should give some indication of what you do, sell or what business you are venturing. (Photography, knitting, painting, sculpting, whatever).


This is the old banner.  Pictures of beads give you a "visual clue" as to what you may find at the shop, and "Extraordinary Ornamentation" is the confirmation.

Avatar:  Your avatar is the picture that represents you on the site.  Many people use a portion of their banner, an image or a picture of themselves.  I have found that a portrait (picture of the seller) works much better than an image or other graphic. People tend to trust a face more than an icon.  You all know what I look like, no sense in posting my own.

Store Front / Items:  There are several schools of thought on this, I will share a couple.

A "full store front".  Some shops do not have enough merchandise to fill up the allotted 24 item boxes on the front page of the shop.  The more you add the more pages will automatically be created.  Apparently it is important to keep at least 24 items in the shop, there is no explanation as to why.  It does however look better to have a full front page.

Featured Items: These are items chosen from your shop that you wish to feature on your shops front or home page.  They are underneath the banner and on top of the 24 items on your front page.  These items should reflect the BEST you have to offer.  If possible be sure that the featured items are not also listed on the front page of the shop.

Variety:  I know it is within our nature to organize like things with like things.  However piling all your earrings on the front page when you also sell bracelets or necklaces isn't going to get those other things noticed or sold!  Diversify the listings, try to look at the page as a catalog of all your merchandise.  A customer / shopper can see that you also carry bracelets and necklaces as well as earrings.   Try to group things vertically and horizontally, this goes with that which could be paired with the other thing.

Currently my front page does not reflect this and I need to do a little re-arranging.

Pictures:  Yes, they are so important.  Clear, focused photos are best.  
Try to take your photos in natural light.  
Do not clutter up the background with stuff, you want people to look at the item not what's in the background.
Use a neutral background, like a gray color, that will not interfere or compete with your item.
Try to take a detail photo, a close up tight shot that shows the pattern, texture, stitch or accent up close.

Remember: Shopping is a tactile experience, people want to pick up the item, look at it, scrutinize it before spending their hard-earned pennies on something!  Try to take pictures that will give the on-line shopper the sense that they have viewed it from all possible angles and given it the full attention it deserves before buying.

I hope some of this has helped.  Good luck fellow vendors!

Thank you for stopping by and having a look.

The Alchemists Vessel would like to wish you a pleasant Thursday.