Last month there was a contest on the Handmade Artists Forum, aimed at making a Movie or a Video showcasing the site we all love and with which we hold buyer or shop accounts.
Because my iMac is not quite vintage but it is outdated, and I was, as were many others for various reasons, unable to compete in the contest. My problem was simply a technical issue. However; in hope that they may try the contest again, it might be helpful for those that don't have Movie Maker (Windows) or just don't like their iMovie program, they might want to try using Picasa. Picasa is a free photo editing program on the web, if you have a blogger blog or a Google account of any kind you probably already have Picasa.
My version is Picasa 3 for Mac OSXs. I am guessing that the program works more or less the same on either a MS or Apple based machine.
I should mention that Picasa is fairly limited to movie making. Basically it is drag and drop photos to a new folder, click a button, let the program do it's thing, add Title Cards (Slides) and add music. A word of *caution about adding music. Facebook WILL delete your video if you attempt to upload it to your page if you use an audio or music file.
How To Make a Movie using Picasa 3
1. If you do not have Picasa you may click the link above to down load it. It is free.
2. Open your Picasa program on your desk top. You do not have to be logged into the web.
3. Click the + File Button at the top of the box.
Follow the Prompts in the Dialog Box
1. Enter a Name for your video
2. Change the date or leave it as is.
3. Choose to include music, click the box, if not leave blank.*
4. Place: I suggest using your business name.
5. Description: Anything you like.
6. Click OK.
Your new folder will appear at the top of the program screen and will be empty.
Select the photos you would like to include in your movie. Picasa should have all of your photos collected for you. Choose from an existing file or upload fresh pictures if you like.
From a File:
1. Click on the photo you would like to add to the movie folder (file).
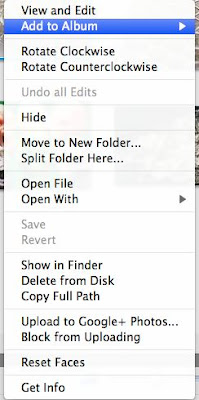
2. Right Click on the picture to bring up the menu.
3. Highlight Add to Album (as above).
4. A selection of available folders will appear, select the one you created for your movie.
NOTE: The picture will be copied to the folder (file) you created for your movie and still remain in its original folder (file) as well.
5. Continue to Add photos to your Album until you are satisfied. *You may edit and add more pictures later.
All done? OK.
Your folder will look something like this.
From the Menu at the top of the screen, click "Create Movie Presentation". It is the third button from the left.
 | |||||||||
| Create Movie Presentation Button |
You will be whisked off to a screen that looks something like this.
You are in the Movie Maker Tab
The First Tab in this window is Movie
This first box is where you may choose your options for music (sync with photos).
Transition Style (What the pictures do when the movie is played , fade, dissolve, etc).
Dimensions - Full Screen or an actual dimension may be chosen.
*I chose 800 x 600 so the photos would not automatically crop to odd views in Full Screen).
The Second Tab in this window is Slide.
This is where you may change the text of the Title Slide (this is the first picture in your movie).
1. You may choose fonts, and varying styles.
2. You may also change the style of you slide's template as well as the wording.
3. Type your changes in the box on the left, they will appear on the slide to the right. Double check your spelling.
4. You may also add more slides by clicking on the icon that looks like a rectangle with lines in it. (See photo).
The photos and slides you have placed in your movie can be seen in the "tray" below the main screen. (See photo above).
Almost there!
The third tab in this window is Clips
If you would like add photos you may do so here.
1. To add photos click Get More.
It is the way you want it?
Great.
Return to the Movie tab.
1. Click "Create Movie".
The movie will take a while to download (mine took about five minutes or less).
The movie will begin when processing is complete.
After the movie ends, if you would like to make any changes it will give you an opportunity to Edit the movie.
You may also return to the Clips page and remove photos after the movie has been processed.
Select individual photos to be removed.
*Remember each edit will take another five or so minutes to process your changes.
After you are satisfied with you film, it will be saved to Picasa under the folder "Movies" (mine was any way)
Before closing out the window, if you would like you may watch the movie again or select the YouTube button and upload the movie to your account.
The finished product can look something like this.
In hope that you have enjoyed the tutorial and that inspiration may strike for your own video, or that you might give it if try, just for fun.
Thank you for stopping by and having a look.
The Alchemists Vessel would like to wish you a pleasant day.


thanks for the lesson...now I'll participate if they have that contest again.
ReplyDeleteDebbi
-yankeeburrowcreations
Wow! that is a really nice and detailed tutorial.
ReplyDeleteReally helpful.... Thanx
ReplyDeleteHow do you burn your movie to a disk?
ReplyDelete