The week is winding down and it's time to do something fun.
Many that follow the blog may be aware that I was "invited" to submit the Chainmaille portions of my blog to an e-publisher for on line or on demanding publishing of a book. Very much like a vanity press, but the content is taken directly from your blog instead of creating a new manuscript.
Instead of attempting to contain this blog to a book's content, a separate one is kept, "In Chains - Contemporary Chainmaille Designs" that will be the final submission for the publishers. In hope of completing the weave instructions followed by eighteen (18) projects to make by the end of year as requested.
Today's Tutorial: Learn to weave Round Maille
Some may recognize similarities to the Box or Queen's Chain Pattern (aka Inca Puno), however, this weave does not produce a box or square chain, it is round.
Weave Notes:
This weave is done in multiples of three (3).
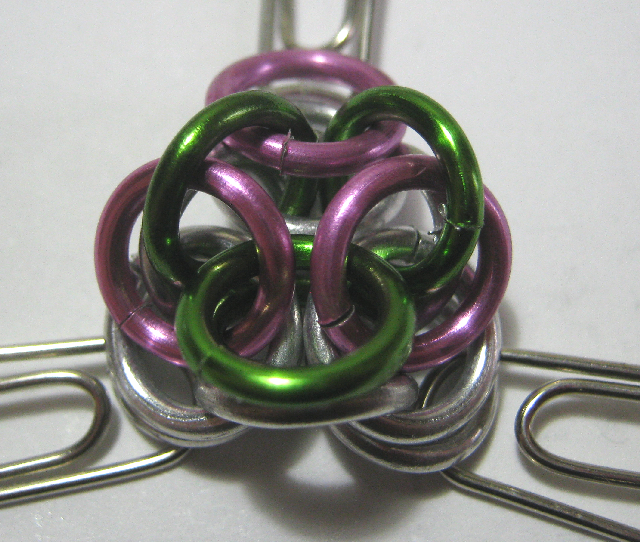
* Silver, Green, Rose colored rings are used to indicate steps.
(We do not recommend Darice rings for a finished project, but for practice they are inexpensive, come in a variety of colors and Outer Diameter Sizes)
AR - This weave isn't terribly AR sensitive, however, it is possible to weave it too tightly or too loosely. I would recommend an AR of 4.1.
You may weave this pattern in single or multiple colors.
There are two ways to weave Round Maille, one is the Fold and Fill Method, as in this tutorial, and the other is like zipping up a pre-made length of chain. This weave belongs to the European Family of weaves / patterns.
Material
21 *10mm 14 gauge Aluminum Jump Rings (5mm ID) by Darice.
Pliers - 2 pairs (Flat nose)
Paperclips, or Markers of some type (twist ties, scrap wire...)
On your marks. Get set. Go.
Pre-Close 6 jump rings
Open 15 jump rings
 1. Create a 5 link unit of 2 x 1 Chain (2-1-2-1-2)

and the first pair of rings,
close the ring.

This creates a triangle.

3. Flip the piece over so it looks like this. The Single rings are now on the out side and double rings lie towards the center. You may also pull the single rings outwards and arrange them to reveal the inner triangle as well.

4. Attach paper clips or
markers to the bottom set of rings. The ones that lie directly on the work surface. This marks the beginning of the chain and gives you something to hold while working the first few sets of rings.
5. Gently push the top rings
into the center forming a
tent. These are rings
1, 2 and 3, in any order
you choose.

6. Open 1 ring and slide
it through jump rings
1 and 2. Close the ring.

7. Open 1 ring and slide
it through jump rings
2 and 3. Close the ring.

8. Open 1 Ring and slide
it through jump rings
3 and 1. Close the ring.
These new rings are now rings
1, 2 and 3

9. Open 1 ring, slide it through
rings 1 and 2. Close the ring.

10. Open 1 ring, slide it through
rings 2 and 3. Close the ring.
 11. Open 1 ring, slide it through rings 3 and 1. Close the ring.
 You now have a piece of chain that looks like this.
12. Fold the rings just added back against the chain, or allow the rings to fall or flop to the sides of the chain. Separate the rings to reveal the inner triangle.
These are now rings 1, 2 and 3.

13. Fill the center of the chain. "Tent" the exposed inside rings.
Open 1 ring, slide it through
rings 1 and 2. Close the ring.


14. Open 1 ring, slide it through rings 2 and 3. Close the ring.

15. Open 1 ring, slide it through rings 3 and 1.
Close the ring.

16. Repeat steps 9 through 15 until the chain reaches the desired length.
As you continue with the length of chain you will see a pattern start emerge.
 |
| Side View |
 |
| Top View |
 |
| Top Down View |
 |
| If it looks like a weird little fish, you're doing it right. |
 |
| 3/4 Profile, Left |
 |
| 3/4 Profile, Right |
To finish you length of chain.
1. Slide one open ring through jump rings 1 and 2.
2. Slide one open ring through jump rings 2 and 3 or 3 and 1.
3. Slide one open ring through the last 2 jump rings just added and attach either part of your clasp.
4. Remove the markers and repeat on the other end.
Thank you for stopping in and having a look. We love feed back, please feel free to leave your question or comment.
The Alchemists Vessel would like to wish you a pleasant day.
No comments:
Post a Comment